Spring Boot でAzure FunctionsのTimerTriggerを実装して、ローカルで動作確認する手順を示す。
プロジェクトの作成方法については、以下の記事参照。
バージョン
Spring Boot:2.7.5
Java:17
ファンクションを新規追加する
ファンクションを新規追加する場合は、HandlerクラスとFunctionクラスをそれぞれ追加する。
この時、Handlerクラスはorg.springframework.cloud.function.adapter.azure.FunctionInvoker<I, O>を継承し、Functionクラスはjava.util.function.Function<T, R>を実装して作成する。
各ファンクションでDIしたいbeanがある場合はConfigurationクラスを作成する。
Configクラスの作成
ファンクションクラスをbean登録するためのConfigクラスを作成する。
その他処理を行うにあたって必要なクラスがある場合は記述する。
// Configクラス
@Configuration
public class TimerConfiguration {
    @Bean
    public TimerFunction timer() {
        return new TimerFunction();
    }
}
Functionクラスの作成
Functionクラスには、ファンクションごとに行いたい処理を記述する。
// Functionクラス
public class TimerFunction implements Function<String, String> {
    @Override
    public String apply(String s) {
        return s;
    }
}
Handlerクラスの作成
Handlerクラスにはトリガーの設定、ファンクションを呼び出す処理を記述する。
// Handlerクラス
public class TimerHandler extends FunctionInvoker<String, String> {

    // Functionクラスのbean登録名とHandlerクラスの@FunctionName("timer")の属性に
    // 指定した名前は一致させる
    @FunctionName("timer")
    public void execute(@TimerTrigger(name = "timer", schedule = "0 */1 * * * *") String timerinfo,
            ExecutionContext context) {
        context.getLogger().info(timerinfo);
        handleRequest("timer", context);
    }
}
引数timerinfoにはファンクション実行時に以下のような値が格納されている。
{
    "Schedule":{
        "AdjustForDST": true
    },
    "ScheduleStatus": {
        "Last":"2016-10-04T10:15:00+00:00",
        "LastUpdated":"2016-10-04T10:16:00+00:00",
        "Next":"2016-10-04T10:20:00+00:00"
    },
    "IsPastDue":false
}
トリガーの設定
トリガーの設定はアノテーションで行う。@FunctionName("timer")を付与したメソッドのパラメーターにcom.microsoft.azure.functions.annotation.TimerTriggerを付与する。
アノテーションの属性については以下の通り。
| 属性名 | 説明 |
|---|---|
| name | リクエストやリクエストボディのファンクションコードで使用される変数名。必須 |
| dataType | パラメータ値をどのように扱うかを定義する。以下の値が設定可能。 "":値を文字列として取得し、POJOにデシリアライズしようとする(デフォルト) string:常に文字列として値を取得する binary:値をバイナリデータとして取得し、byte[]にデシリアライズしようとする |
| schedule | cronでファンクション実行のタイミングを設定する。必須{second} {minute} {hour} {day} {month} {day-of-week}形式 |
スケジュールの各項目の概要と設定可能な値は以下の通り。
| 項目 | 概要 | 設定可能な値 |
|---|---|---|
| second | 秒 | 0-59 |
| minute | 分 | 0-59 |
| hour | 時間 | 0-23 |
| day | 日 | 1-31 |
| month | 月 | 1-12 |
| day-of-week | 曜日 | 0-6(0が日曜日) |
スケジュールの設定例をいくつか示す。
| スケジュール | 設定 |
|---|---|
| 1月の毎週月曜日の午前9時30分 | 0 30 9 * 1 1 |
| 平日の午前9時30分 | 0 30 9 * * 1-5 |
| 5分間隔 | 0 */5 * * * * |
CRON式で使用する既定のタイムゾーンはUTC。
別のタイムゾーンに基づくCRON式を使うには、Function App用にWEBSITE_TIME_ZONEという名前のアプリ設定を追加する。参考
ただしローカルで実行する場合はシステムのタイムゾーンとなる。
// 記述例
public void execute(@TimerTrigger(name = "timer", schedule = "0 */1 * * * *") String timerinfo,
                    ExecutionContext context) {
}
ファンクションを呼び出す処理
O FunctionInvoker<I, O>.handleRequest(I, ExecutionContext)メソッドでファンクションを呼び出すことが出来る。
// 記述例
String response = handleRequest(timerinfo, context);
ローカルでの動作確認
Timer Triggerの起動には、Azure Blob Storageが必要。
今回は、ローカル環境で使用できるAzure Blob StorageのエミュレータであるAzuriteを使用する例を示す。
Azuriteの導入
コマンドプロンプトで以下のコマンドを実行する。
npm install -g azurite
インストール完了後にc:\\azuriteディレクトリを作成し、以下のコマンドでAzuriteを起動する
azurite --silent --location c:\\azurite --debug c:\\azurite\\debug.log
起動すると以下のようなログが表示される
C:>azurite --silent --location c:\\azurite --debug c:\\azurite\\debug.log
Azurite Blob service is starting at http://127.0.0.1:10000
Azurite Blob service is successfully listening at http://127.0.0.1:10000
Azurite Queue service is starting at http://127.0.0.1:10001
Azurite Queue service is successfully listening at http://127.0.0.1:10001
Azurite Table service is starting at http://127.0.0.1:10002
Azurite Table service is successfully listening at http://127.0.0.1:10002
起動中のAzuriteはCtrl + cで停止できる。
ファンクションの設定
ファンクションプロジェクトのlocal.settings.jsonを開き、AzureWebJobsStorageにUseDevelopmentStorage=trueと設定する。
{
  "IsEncrypted": false,
  "Values": {
    "AzureWebJobsStorage": "UseDevelopmentStorage=true",
    "FUNCTIONS_WORKER_RUNTIME": "java",
    "MAIN_CLASS":"jp.co.sample.functions.Application"
  }
}
ファンクションの処理の中でAzureBlobStorageに対して処理を行っている場合、以下の接続設定を利用する。 以下はAzuriteの接続設定である。
| 設定 | 値 |
|---|---|
| アカウントキー | Eby8vdM02xNOcqFlqUwJPLlmEtlCDXJ1OUzFT50uSRZ6IFsuFq2UVErCz4I6tq/K1SZFPTOtr/KBHBeksoGMGw== |
| アカウント名 | devstoreaccount1 |
| Blobエンドポイント | http://127.0.0.1:10000/devstoreaccount1 |
Azurite起動中はMicrosoft Azure Storage Explorerの「ローカルで接続済み」->「ストレージアカウント」->「エミュレーター」で起動中のエミュレータの操作をすることも可能。
ファンクション動作確認
ファンクションの作成完了後にプロジェクトをビルドする。
gradlew azureFunctionsPackage
以下のコマンドでAzuriteを起動する
azurite --silent --location c:\\azurite --debug c:\\azurite\\debug.log
ファンクションを起動する。
gradlew azureFunctionsRun
起動に成功すると以下のようにファンクションの一覧が表示される。
> Task :azureFunctionsRun
Azure Function App's staging directory found at: C:\\pleiades-2021-06\\pleiades\\workspace\\hello-spring-function-azure-gradle\\build\\azure-functions\\java-functions

Azure Functions Core Tools
Core Tools Version:       3.0.3734 Commit hash: 61192bb28820be76916f85209916152801483456  (64-bit)
Function Runtime Version: 3.1.4.0

Functions:

        http: [POST] <http://localhost:7071/api/http>

        eventgrid: eventGridTrigger

        timer: timerTrigger
起動後にスケジュールに記載したタイミングでファンクションが実行される。
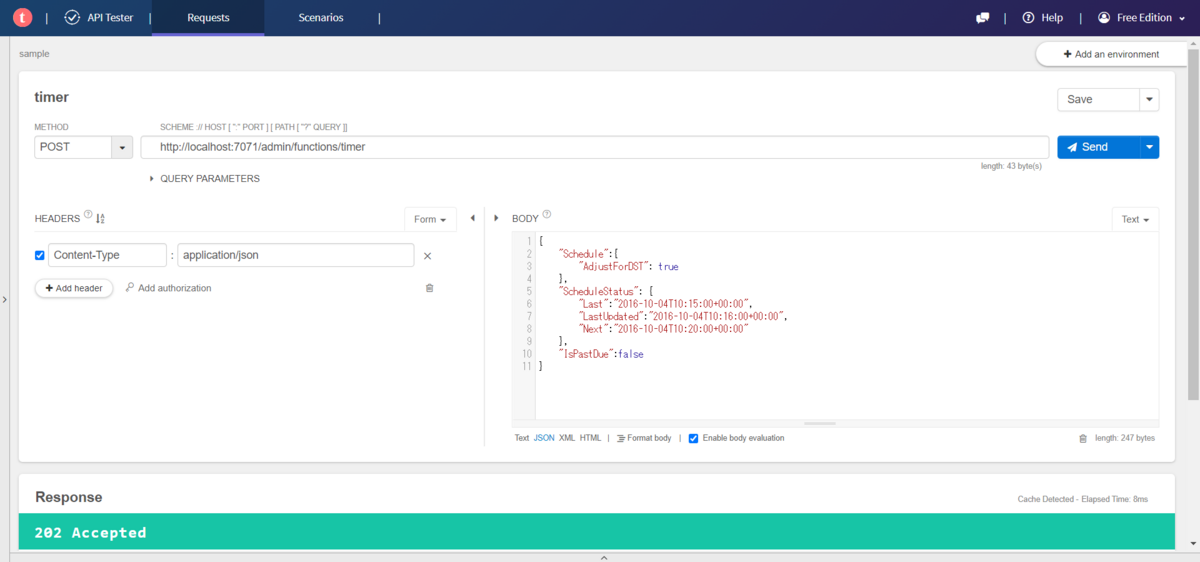
任意のタイミングでファンクションを実行したい場合は以下のURLに対してPOSTリクエストを送信する。
http://localhost:7071/admin/functions/{ファンクション名}
その際、POSTデータには以下を張り付ける
{
    "Schedule":{
        "AdjustForDST": true
    },
    "ScheduleStatus": {
        "Last":"2016-10-04T10:15:00+00:00",
        "LastUpdated":"2016-10-04T10:16:00+00:00",
        "Next":"2016-10-04T10:20:00+00:00"
    },
    "IsPastDue":false
}
他のTriggerの作成に関する記事も書いています。